Airflow — Build, Host, Maintain Your Own Dependencies with GitHub and Docker Hub (for free)
build and maintain Airflow images completely open source and free, maintain infrastructure as code, and with good security.
Airflow — Build, Host, Maintain Your Own Dependencies with GitHub and Docker Hub (for Free)
In Mobagel, we use Airflow to run various data processing tasks, and as Airflow’s document suggested, it is highly recommended that we maintain our own dependencies in our production environment.
Airflow has more than 60 community managed providers (installable via extras) and some of the default extras/providers installed are not used by everyone, sometimes others extras/providers are needed, sometimes (very often actually) you need to add your own custom dependencies, packages or even custom providers.
This guide shows you how to use open source community tool to build and maintain your own airflow image.
Setup Docker Hub Account
Docker Hub is a platform that host your docker images for free, so you need to create an account on docker hub first (or ask you colleague to share organization account to you).
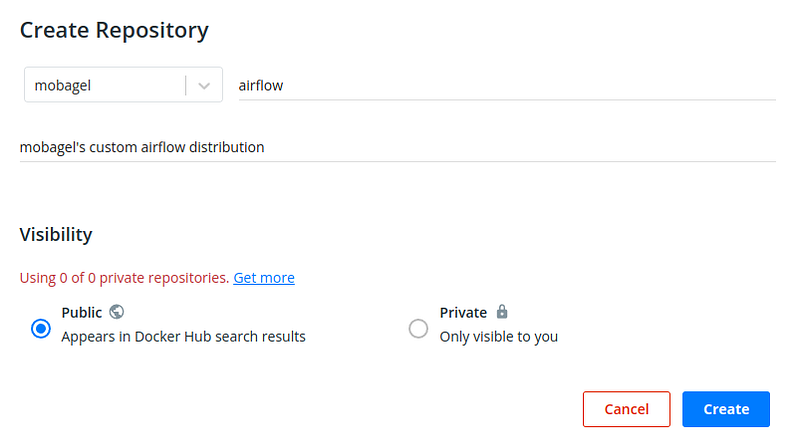
Go to repositories -> Create Repository

You may name your repository airflow, because image name under different namespace will not conflict with each other.
Setup Airflow Build Pipeline
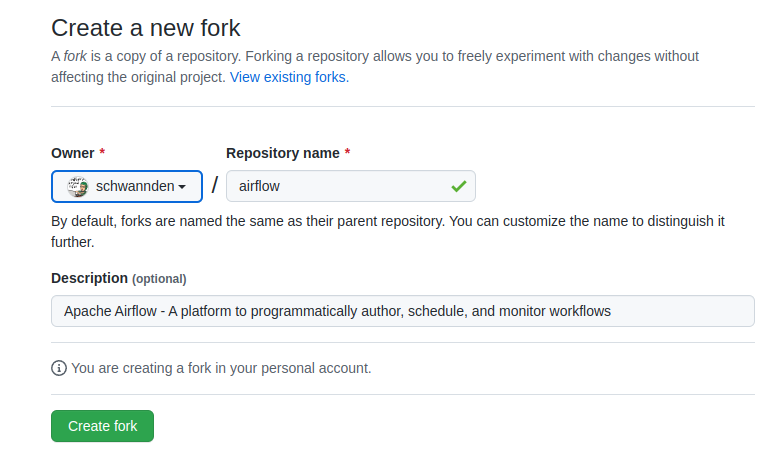
Now, you may go to airflow’s official repository, and fork the official repository to your organization/account.
Now, you want to add your own build pipeline file. I recommend you create a branch from the desired version first, and do not commit on the original airflow branch. This just makes future pulls from upstream easier. In our example, let’s call it custom-release branch, and branch if from v2–3-stable.git clone [your_forked_repo]
git checkout v2–3-stable git checkout -b custom-release git push -u origin custom-release
Now we may add our workflow file .github/workflows/cd.yaml (example file).name: Publish Docker image
on:
release:
types: [published]
jobs:
push_to_registry:
name: Push Docker image to Docker Hub
runs-on: ubuntu-latest
steps:
- name: Check out the repo
uses: actions/checkout@v3
- name: Log in to Docker Hub
uses: docker/login-action@f054a8b539a109f9f41c372932f1ae047eff08c9
with:
username: ${{ secrets.DOCKER_USERNAME }}
password: ${{ secrets.DOCKER_PASSWORD }}
- name: Extract metadata (tags, labels) for Docker
id: meta
uses: docker/metadata-action@98669ae865ea3cffbcbaa878cf57c20bbf1c6c38
with:
images: mobagel/airflow
- name: Build and push Docker image
uses: docker/build-push-action@ad44023a93711e3deb337508980b4b5e9bcdc5dc
env:
AIRFLOW_GPL_UNIDECODE: yes
with:
context: .
push: true
tags: ${{ steps.meta.outputs.tags }}
labels: ${{ steps.meta.outputs.labels }}
build-args: |
AIRFLOW_VERSION=2.3.2
AIRFLOW_EXTRAS=async,celery,cncf.kubernetes,dask,docker,grpc,http,ldap,postgres,redis,statsd,virtualenv
PYTHON_BASE_IMAGE=python:3.8-slim-buster
ADDITIONAL_PYTHON_DEPS=scikit-learn==1.0.2 slack-sdk==3.14.1 simplejson==3.17.6 glom==22.1.0
A few notes about this pipeline file:
- We set the trigger condition to on publish, so this pipeline is triggered if a release is issued on GitHub page.
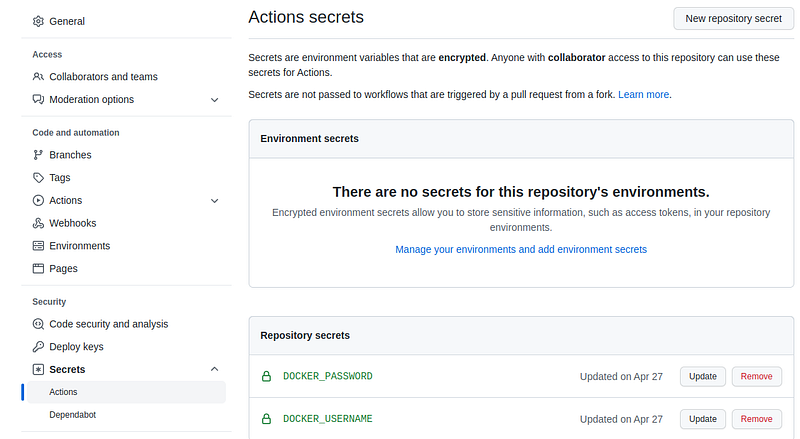
- In the login step, we need to provide our Docker hub login username and password. We put these variable as GitHub secret. You can go to GitHub repository page > Settings > Secrets > Action to add your secret.
- In the step build, we may give supported arguments by Airflow to build our custom image. In our case, we removed a lot of default
AIRFLOW_EXTRASto reduce our image size, fixedAIRFLOW_VERSIONandPYTHON_BASE_IMAGE, and added our ownADDITIONAL_PYTHON_DEPS.
After you setup this file, push to your custom-release branch and you are good to go.git add .
git commit -m"adding custom build flow"
git push
Start Your Airflow Build
After all this setup, you may inform your team members about the process for creating a pull request on this repository. If anyone wants to make adjustments to dependencies, tell them to update the ADDITIONAL_PYTHON_DEPS variable in .github/workflows/cd.yaml , and push to custom-release branch (or create a pull request depending on your team policy).
To trigger release, create a release from your repository page > Releases > Draft to draft a new release.
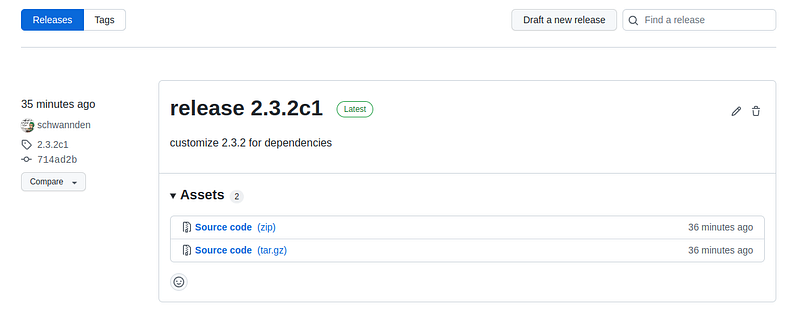
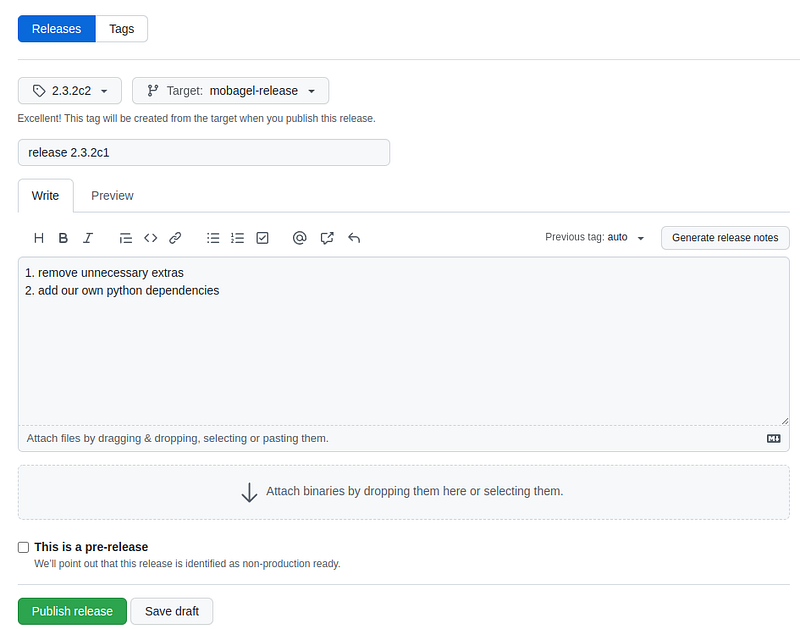
- In tag, choose a tag of your choice. We used
[airflow-version]c[our-version], so our tag is in the form of2.3.2c1. Note that this tag will also be the tag of your image. - Select the
custom-releasebranch as target branch. - Fill in the release title and release message and click publish release. Then, your image build will be triggered automatically (you may view build status from repository page > Actions).
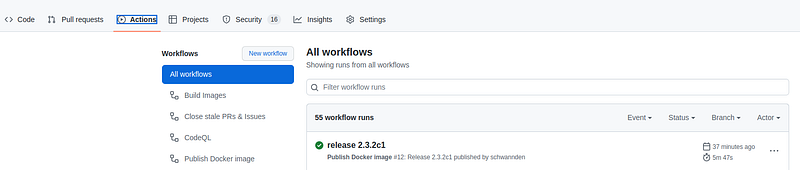
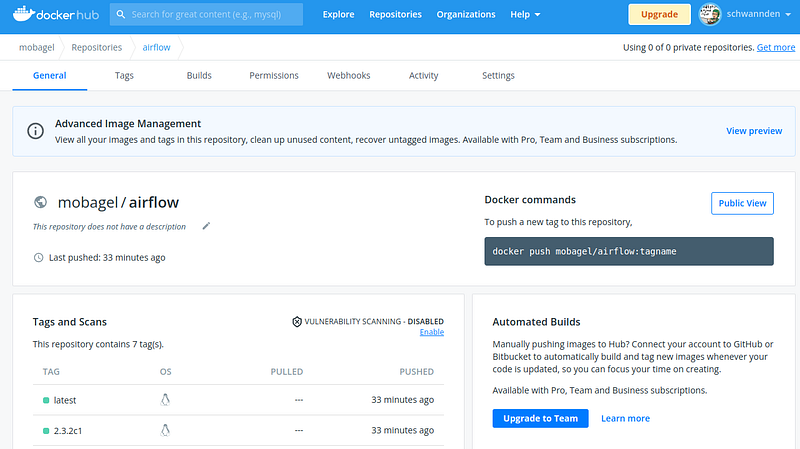
After the image is built, go to your own Docker Hub page to verify that the image with the new tag has been published.
Concluding Remark
- After introducing this workflow, the company’s infrastructure maintainer no longer need to help the team upgrade Airflow images. And it is very easy to train our team member to execute this flow on their own.
- Compared to the approach of training team member to actually build and push their own image, this approach is much easier in the sense that publishers don’t need to install Docker on their own computer, don’t need to understand Docker build command. Security wise, only the pipeline is allowed to push images. This way we don’t need to give away credentials to each developer. IaC-wise, each version of our own custom image is version controlled, and traceable.
- Hosting repositories on GitHub or Docker Hub and using their free service sounds good. But for enterprises, the issue has always been whether we can open source these code. Since Airflow itself is already open sourced, and it is generally not too much of an issue to reveal our Airflow dependencies, the whole solution of building and hosting Airflow is quite acceptable. If your company is customizing Airflow in a way that would reveal business secret or introduce security concerns, you’ll need to consider a private approach of your own.
Conclusion
And with that, you’ve crossed another level to becoming a boss coder. GG! 👏
I hope you found this article instructional and informative. If you have any feedback or queries, please let me know in the comments below. And follow SelectFrom for more tutorials and guides on topics like Big Data, Spark, and data warehousing.
The world’s fastest cloud data warehouse:
When designing analytics experiences which are consumed by customers in production, even the smallest delays in query response times become critical. Learn how to achieve sub-second performance over TBs of data with Firebolt.