Multiple K8s Cluster Management with Rancher + K3S
This blog is a code walkthrough on how to setup Rancher (a K8s management tool ) and K3S (a lightweight production ready k8s engine) on my…

This blog is a code walkthrough on how to setup Rancher (a K8s management tool ) and K3S (a lightweight production ready k8s engine) on my Ubuntu machine.
My environment is Ubuntu 20.04 with an Intel chip.
Clean Up Your Machine First
- If you had Docker related services running on this machine, refer to this guide.
- Disable firewall sudo:
ufw disable
3 Flush Firewall and restart Docker.sudo iptables -P INPUT ACCEPT
sudo iptables -P FORWARD ACCEPT
sudo iptables -P OUTPUT ACCEPT
sudo iptables -t nat -F
sudo iptables -t mangle -F
sudo iptables -F
sudo iptables -X
sudo service docker restart
Install a K3S Cluster for Rancher
If you are going for production with Rancher, eventually you need to install Rancher on a cluster, so we might as well do it now.
First, you want to setup a DNS record for your rancher host (or you can use your own machine’s IP for testing purposes).
Next, start K3S from the latest stable version. With just one line you should have a K8s cluster running (with load balancer, ingress, storage class, coreDNS, … etc.).curl -sfL https://get.k3s.io | sh -s - server
sudo k3s kubectl get nodes # confirm it is running
To install Rancher, let’s use its helm chart. So let’s install helm first.curl -fsSL -o get_helm.sh https://raw.githubusercontent.com/helm/helm/main/scripts/get-helm-3 chmod 700 get_helm.sh ./get_helm.sh
Now, you are almost ready to install Rancher. Since Rancher comes with https enabled by default (which is also a great choice), you can choose to use your own certificate. Use Let’s Encrypt, or use Cert Manager to sign your own certificates for now.
If you choose to sign your own certificate for now, you need to install cert-manager first. On Rancher’s official guide, you can select the method you like and get corresponding instructions. Since I am using my own certificate file, this is my next step:helm install rancher rancher-stable/rancher \
--namespace cattle-system \
--set hostname=rancher.mydomain.com \
--set bootstrapPassword=verySecretivePasswordIndeed \
--set ingress.tls.source=secret
It could take 5 ~ 10 minutes for Rancher to be fully initialized, then you may follow the link from this commandecho https://rancher.mydomain.com/dashboard/?setup=$(kubectl get secret --namespace cattle-system bootstrap-secret -o go-template='{{.data.bootstrapPassword|base64decode}}')
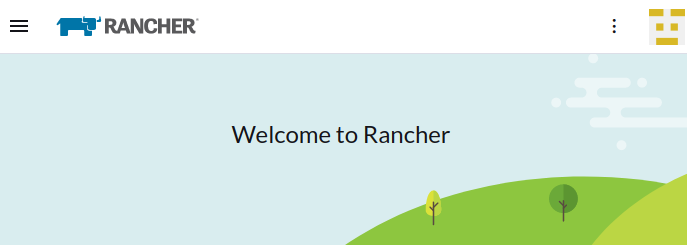
Welcome to Rancher!
Starting a K3S Cluster Managed by Rancher
On the machine you wish to start a K3s cluster on, go through the same node clean up process. Also, remember that your node and Rancher server need to find each other though a DNS service (overwriting your /etc/hosts file will not work since Rancher does not take your system’s /etc/hosts file).
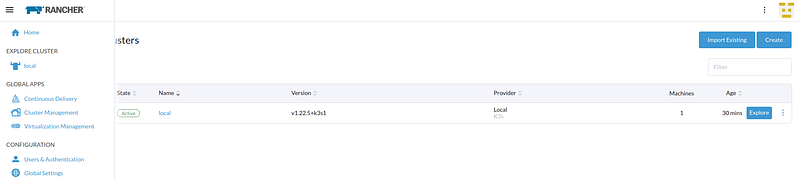
Now, in Rancher, click side menu > Cluster Management. Here you will see a cluster already present. This is the cluster used for installing Rancher. Please don’t install your own deployments here.
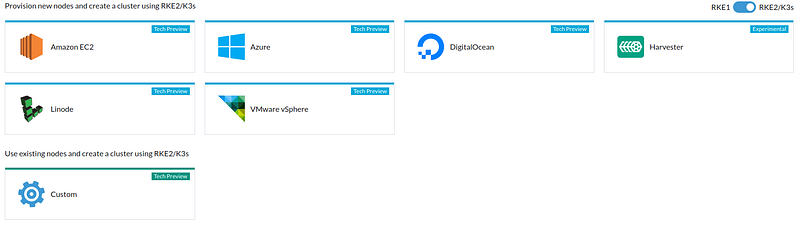
Let’s create another cluster.
Click Create > Swich the RKE2/K3S label on (believe me, K3S is much better than the old RKE1). Click custom.
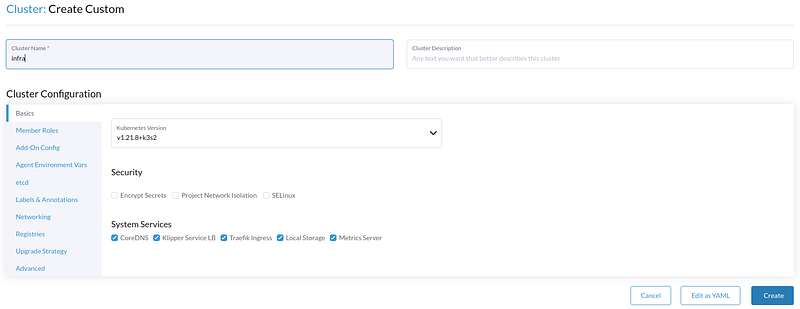
Enter cluster name, select stable K3S version, click create — It’s that simple!
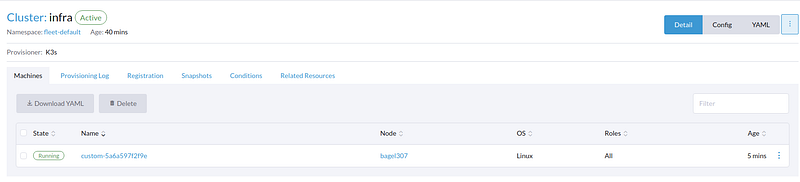
Register a Machine to Cluster
Now that we have a cluster, let’s register the node we just cleaned up to this cluster. When the above instruction is followed, you will be led to this page:
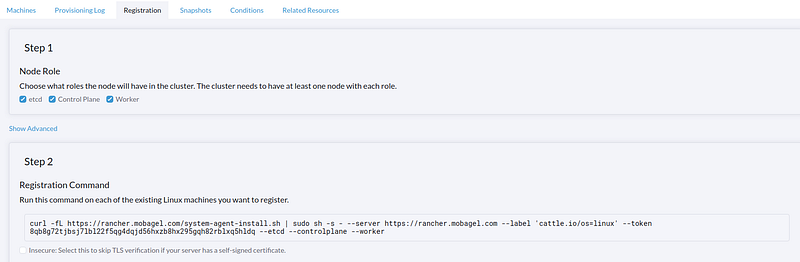
Follow the instruction, and enable etcd, control, and worker in this cluster. K3s is light weight, so don’t be afraid to put everything into the same machine. If you used a self-signed certificate that is not secure, you need to check the insecure box as well. Copy and paste the register command on the node for which you wish to start K3s cluster.
If everything goes well, this first worker node should start in less than 5 minutes.
Test Your Deployment
Now, we can use an example provided by Rancher to check on our deployment.
First, in my internal DSN, I setup a DNS record to point infra.mobagel.com → 192.168.3.7, which is the machine that hosts our infra cluster. You can choose to use your own host file to configure this.
On Rancher, create deployment in Cluster Management → click explore on infra cluster → Workload → Deployments → Create. Give it the following configuration, then click create.name: hello (can be anything)
image: rancher/hello-world
port: 80
Note this deployment with IP type set to Cluster IP. It means we use cluster’s internal IP address, so this deployment is not accessible yet. Now, go to Service Discovery → Ingresses → Create.
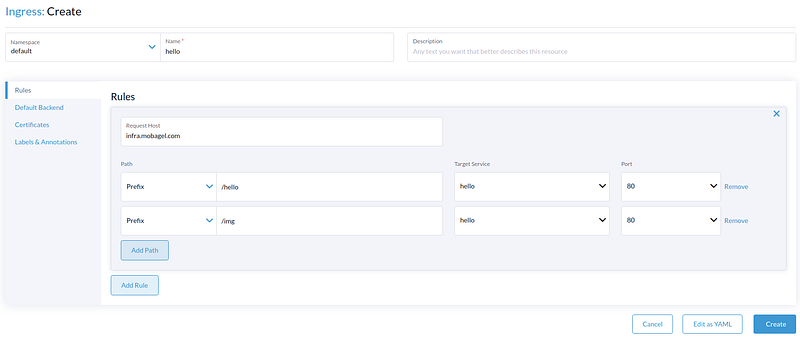
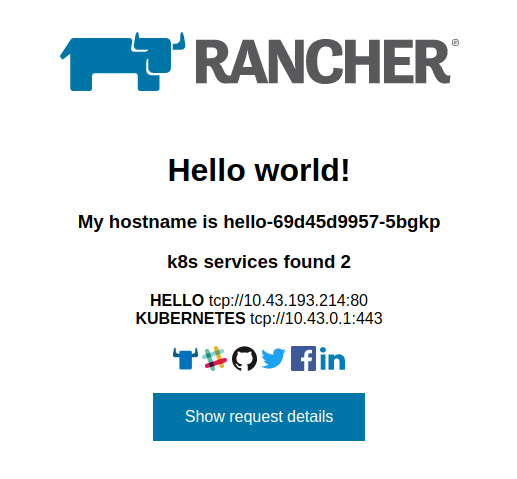
Voila! You have a public app deployed! You may visit: http://infra.mobagel.com/hello to check your deployed app.
Where to Go From Here?
- Read Rancher’s doc by all means!
- Start doing some experiment on the UI to try out Kubernetes’s many features. For example, you may register another machine, scale this hello app to 10, and see if apps are really deploying on different servers. Then shutdown one of the services to see your K3s engine re-spawn the pods on available nodes for you.
And with that, you’ve crossed another level to becoming a boss coder. GG! 👏
I hope you found this article instructional and informative. If you have any feedback or queries, please let me know in the comments below. And follow SelectFrom for more tutorials and guides on topics like Big Data, Spark, and data warehousing.
The world’s fastest cloud data warehouse:
When designing analytics experiences which are consumed by customers in production, even the smallest delays in query response times become critical. Learn how to achieve sub-second performance over TBs of data with Firebolt.